My 14" M2 MacBook Pro died after a reboot. It went down, never came back up, and no amount of button-holding would bring it back. This is the writeup of how I got it back from the brink, including why the documented DFU procedure failed me and how a small tool from the Asahi Linux project saved the machine.
The symptom
The laptop was completely dark. No chime, no Apple logo, no keyboard backlight, nothing on the internal display. The one sign of life: it was pulling a steady ~17W over USB-C according to my inline power meter.
That detail matters. A board drawing real current (not an idle trickle) but never completing POST is the classic “powered but won’t boot” signature. Something on the board was alive enough to negotiate a PD profile, but the SoC never came up far enough to drive video or start the boot chain.
Triage: ruling out the easy stuff
Before assuming the worst, I worked through the obvious suspects:
- Charger and cable: swapped both for known-good units. Still 17W, still dark.
- Ports: tried every USB-C port and the HDMI out. No change.
- External display: nothing on an external monitor either, which rules out a dead internal panel or display cable and points at the boot path itself.
- Force restart: held the power button for 10+ seconds, released, pressed again. On Apple Silicon there is no SMC or NVRAM reset anymore, so this hold sequence plus pulling power is the only “reset” you get. It did nothing.
At this point the remaining non-destructive option is a DFU revive. Revive reflashes the firmware and recoveryOS without touching the SSD (I have enough backups but easier is always better). Given that the machine bricked itself mid-reboot, a botched firmware state was a very plausible cause.
The DFU wall
DFU revive on Apple Silicon is a two-machine job. The dead Mac is the target, and you need a second working Mac running Apple Configurator (or Finder on recent macOS) as the host. I had an M1 MacBook Air to play host, so the setup was there.
The documented procedure goes like this:
- Connect the host to the target’s DFU port. On the 14" and 16" MacBook Pro that’s the port next to the MagSafe connector.
- Power the target via MagSafe, open Finder on the host.
- On the target’s built-in keyboard, hold right Shift + left Option + left Control + power for about 10 seconds, release the three modifiers, then keep holding power until the device shows up in Configurator.
- The screen stays black the whole time. The only success signal is the DFU device appearing on the host.
I ran this combo at least a dozen times. Different hold durations, different release timing, fresh attempts after fully powering the board down. The device never once registered in Configurator.
This is a known pain point. The key combo is finicky on a healthy machine, and on a board that is already misbehaving the timing window seems to close entirely. Without the target ever appearing in Configurator, there was nothing to revive. Dead end.
macvdmtool to the rescue
Instead of fighting the keyboard gymnastics, you can ask the target’s USB-PD controller to enter DFU directly. Apple Silicon Macs expose a set of debug functions over USB Power Delivery Vendor Defined Messages (VDMs) on the CC lines. The Asahi Linux project ships a tool that speaks exactly this protocol: macvdmtool. Thank you @stacksmashing for pointing me in the right direction!
It runs on an Apple Silicon Mac (host) and sends VDMs to another Apple Silicon Mac (target) over a plain Type-C cable. Among other things, it can drop the target straight into DFU with a single command. No keyboard timing, no guesswork, deterministic every time.
Setup
Connect the two machines via their DFU ports. The README is specific about which port:
- rear port on the MacBook Air and 13" MacBook Pro
- the port next to the MagSafe connector on the 14" and 16" MacBook Pro
- the port nearest the power plug on the Mac mini
For the dfu command an Apple-style USB 2.0 cable (the kind that ships with non-MagSafe MacBooks) is fine, since the VDMs ride the CC lines, not the data pairs. If you want serial mode later you need a proper USB 3.0 / SuperSpeed cable, but for forcing DFU the cheap cable works. Thunderbolt cables work too.
Build
On the M1 host, with the Xcode command line tools installed:
git clone https://github.com/AsahiLinux/macvdmtool
cd macvdmtool
make
Force DFU
One command, as root:
sudo ./macvdmtool dfu
The moment I ran sudo ./macvdmtool dfu, the dead MacBook dropped into DFU and showed up in Configurator on the host. After a dozen failed key-combo attempts, the VDM approach worked on the first try. No idea why apple couldn’t just ship this command with an easy to use button.
The revive
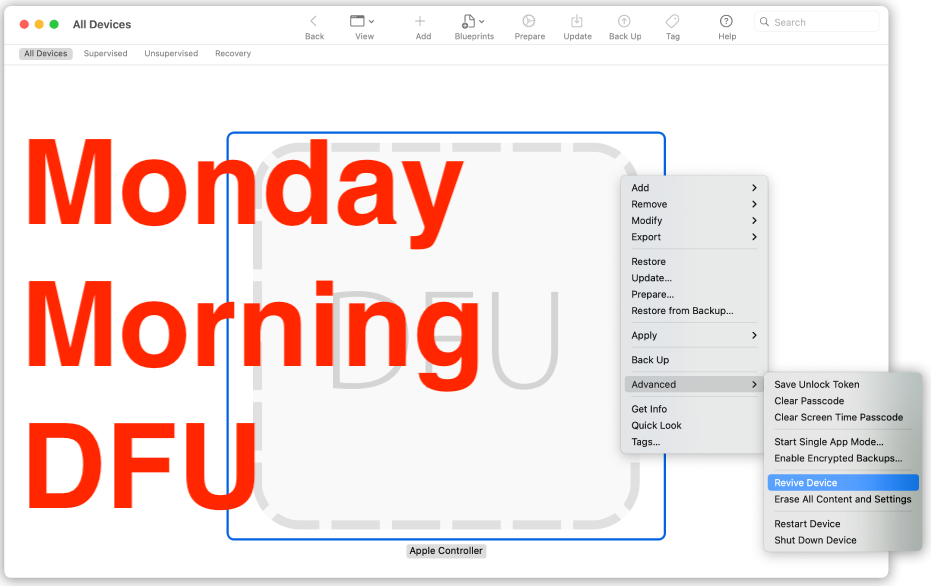
With the target finally sitting in DFU, the rest was the standard Configurator flow:
- Right-click (Control-click) the DFU device in Configurator.
- Advanced → Revive Device.
- Confirm, then leave both machines on power and connected while it pulls the firmware IPSW and reflashes.
Revive preserves the SSD, so it is the right first move. The target rebooted itself partway through, the Apple logo and progress bar came back, and it booted clean into macOS. The firmware was the problem all along.
BackUps
This whole ordeal started on a Monday, 10min before my first meeting. As I’m (by some proxies) self-employed, I’m responsible for my IT and my customers expect me to arrive on time. I therefore have a second macbook, with all my data ready to go at any time and I keep it in sync.
Additionally, I keep automated backups at:
- an external SSD on my desktop
- the NAS in my basement
- the NAS at an offsite location
This allowed me to stay relatively calm, despite the obvious annoyance.